

Already Working With Technical Support?
If a CCTV Security Pros technician has asked to remotely connect to your computer, open our approved TeamViewer page. Your representative will guide you through the next steps.
Security Camera Technical Support & Setup Center
Find setup instructions, troubleshooting help, manuals, software, visual walkthroughs, video guides, technical specifications and remote support for CCTV Security Pros security camera systems.
Product-Line Support Centers
Select the correct equipment family before following setup or troubleshooting instructions.
SureVision Support
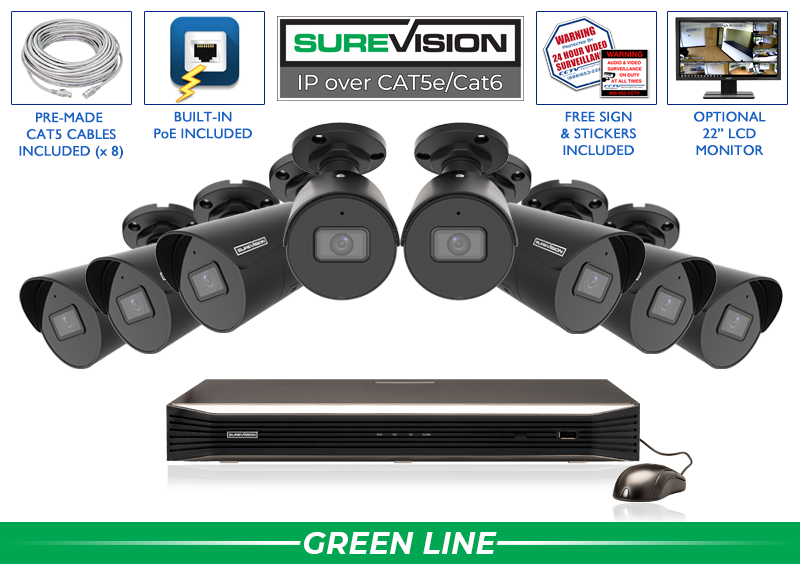
Setup help, visual troubleshooting guides, manuals, software, videos and specifications for SureVision NVRs and IP cameras.
Blue Line Support
Manuals, DMSS setup, SmartPSS software, networking, troubleshooting and specifications for Blue Line systems.
Black Line Support
DVR manuals, coax camera troubleshooting, BNC wiring, DMSS, SmartPSS and specifications for Black Line systems.
Top 15 Security Camera Technical Support Questions
Use these step-by-step answers for remote viewing, offline cameras, playback, passwords, network changes, recording, alerts and video export. Screen wording can vary by recorder model and firmware.
1. How do I set up remote viewing on my phone or computer?
Remote viewing requires the recorder to be connected to your router and online before the app can reach it. Confirm the recorder locally first.
1. Connect the recorder's LAN/network port to your router with an Ethernet cable.2. Open the recorder's Network or P2P screen and confirm it shows Online.
3. Install the current viewing app or supported computer client.
4. Add the recorder by scanning its device QR code or entering the requested information.
5. Enter the recorder username and password; these may differ from the app-account password.
6. Open Live View and select the recorder and cameras.
If it does not connect: confirm the recorder is online, check the cable and verify the saved device username and password before changing router settings.
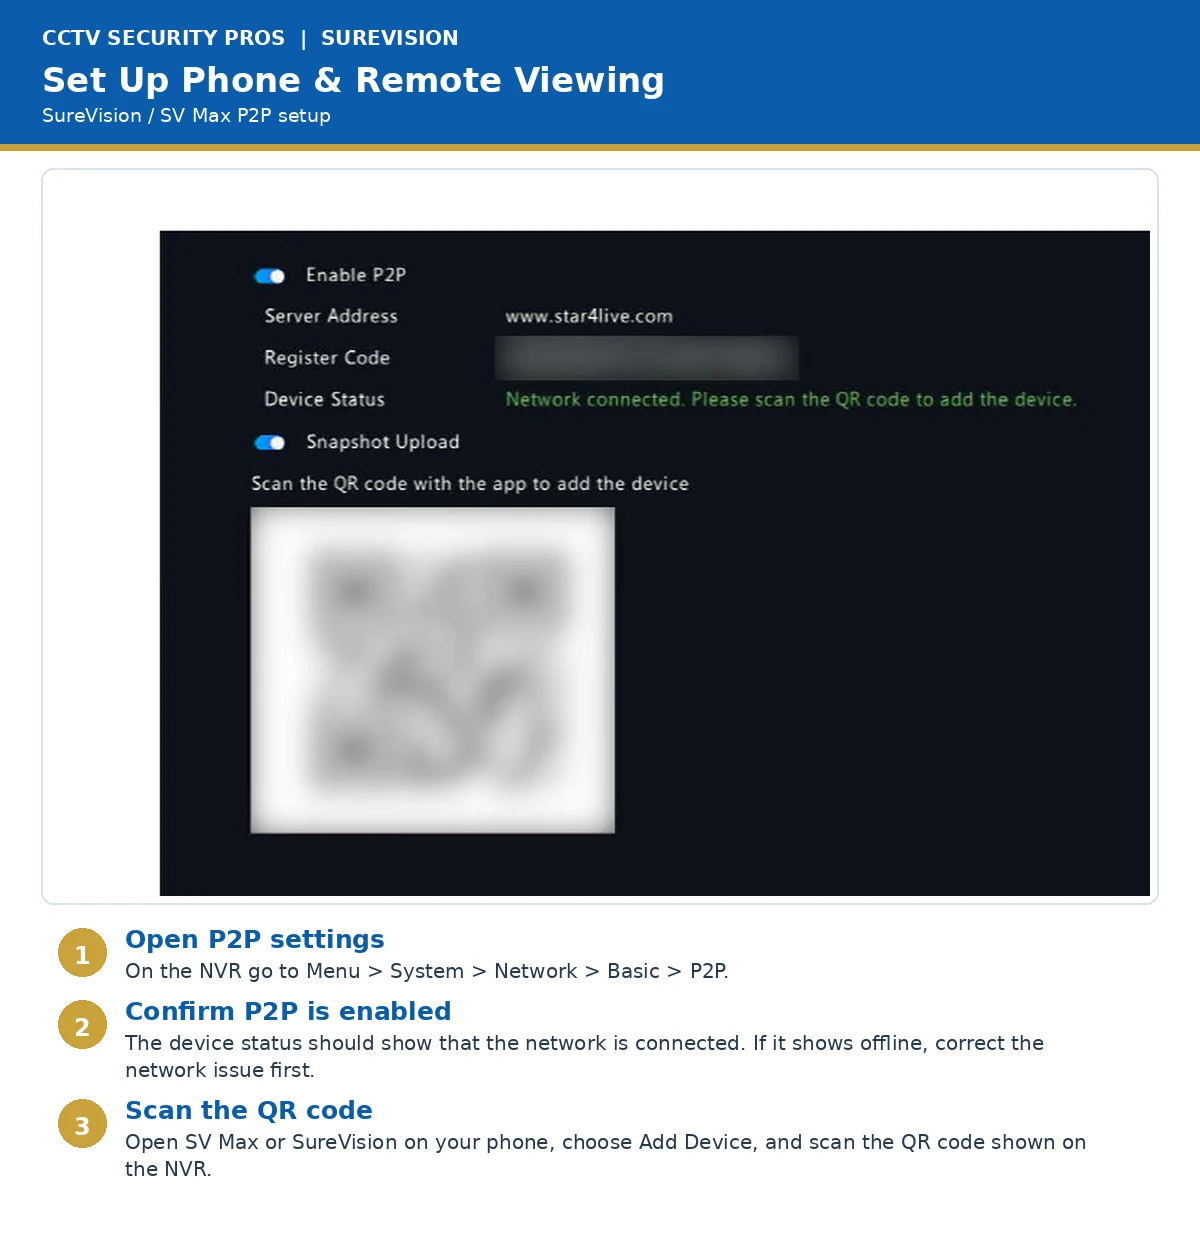
2. Why is a camera offline, showing no video or reporting no signal?
Determine whether the failure follows the camera, installed cable or recorder port.
1. Note the affected channel and error message.2. Reseat both cable ends and inspect connectors for damage or moisture.
3. Connect the camera at the recorder with a short, known-good cable.
4. Test it on a port that works with another camera.
5. If it works locally, troubleshoot the installed cable. If it fails on a known-good cable and port, contact support.
Stop and contact support if you suspect PoE damage, water intrusion or equipment failure.
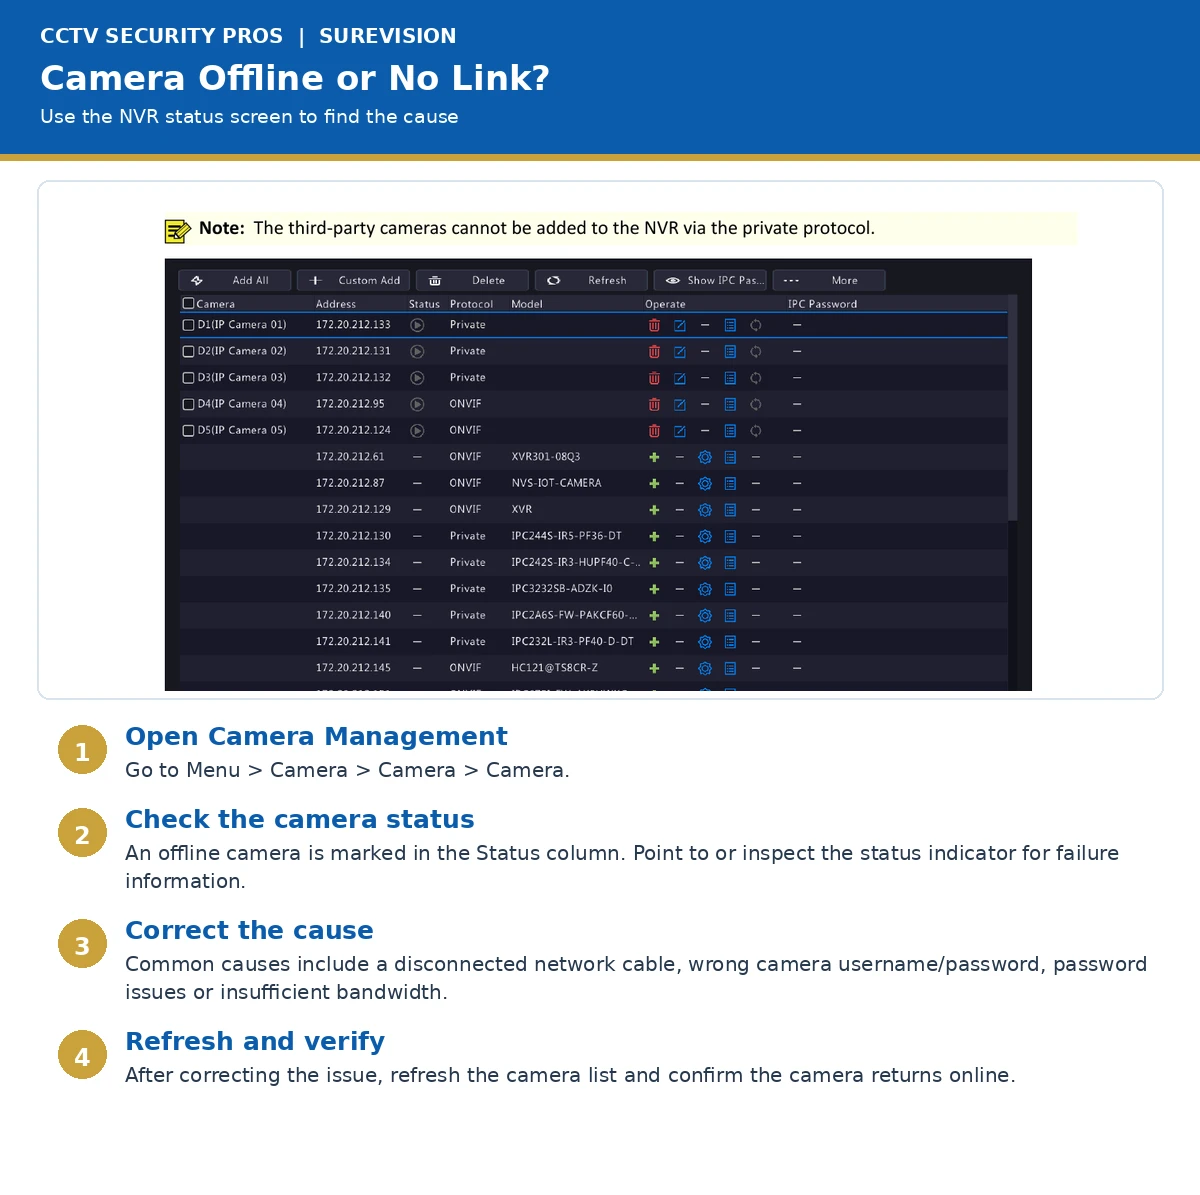
3. How do I find and play recorded security camera video?
2. Select the camera or cameras to review.
3. Choose the correct date; dates with video are often marked.
4. Move the timeline to the approximate incident time.
5. Zoom the timeline or use event filters, then use the playback controls.
No recording? Check the recorder date/time, channel schedule and hard-drive status. Older footage may have been overwritten.
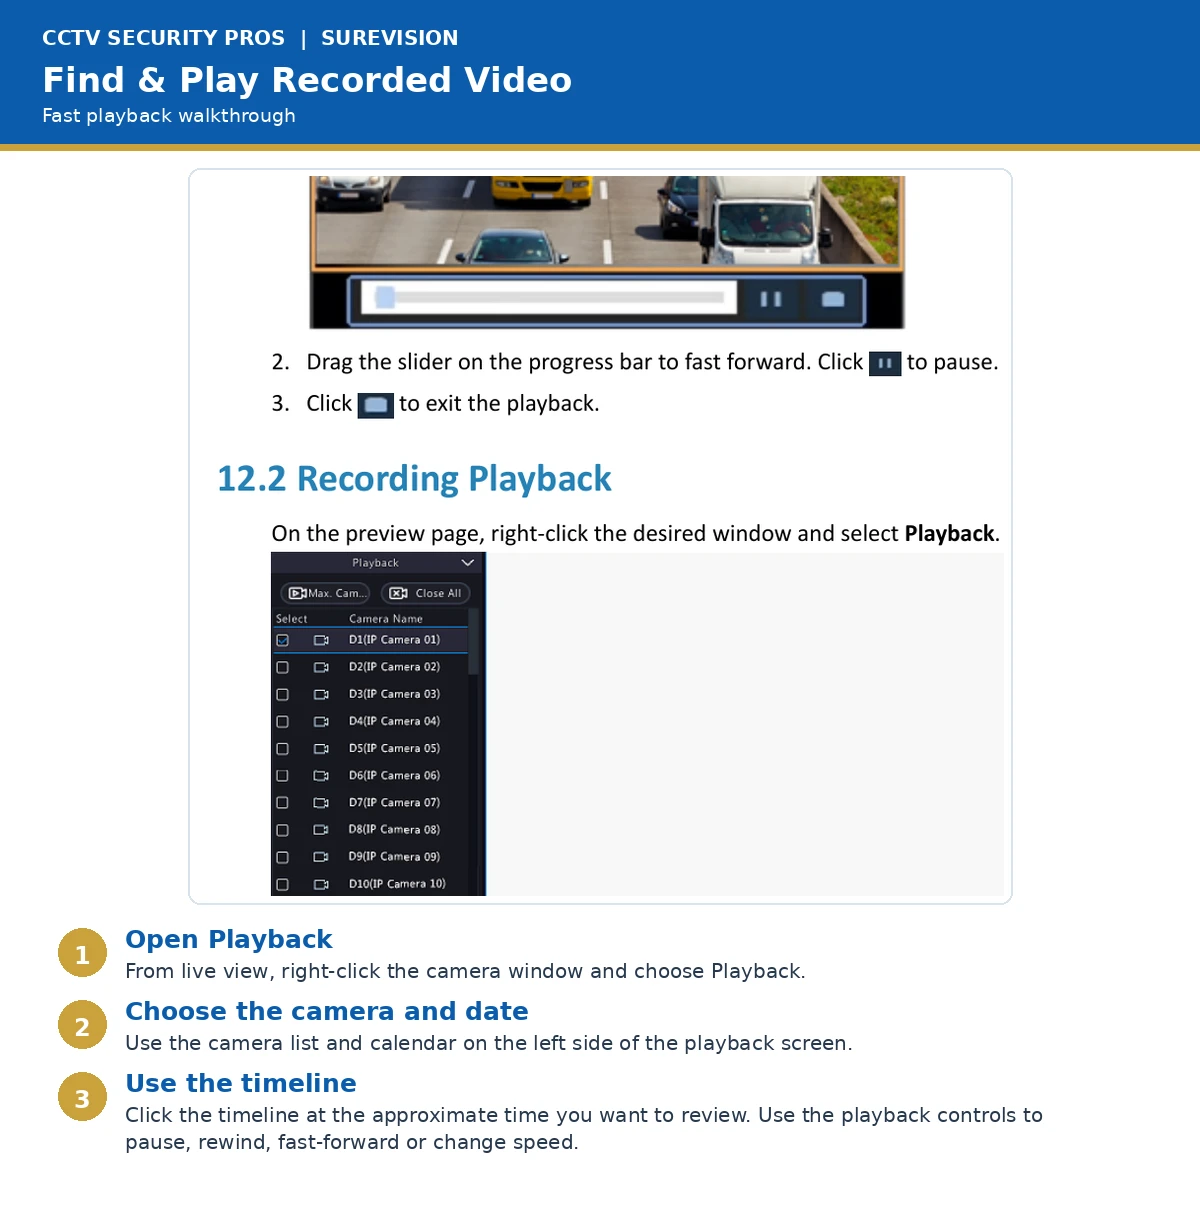
4. I changed my router or internet provider. How do I reconnect the system?
A router or provider change normally affects the recorder's network connection, not the camera-to-recorder connections.
1. Connect the recorder's LAN port to the new router with a known-good cable.2. Open Network/TCP-IP settings.
3. On a normal home or small-business network, enable DHCP and apply.
4. Confirm a valid IP address, gateway and DNS.
5. Wait for P2P/remote access to show Online.
6. Refresh the app. Do not delete the device unless instructed.
Managed networks, VLANs, firewalls and static addresses may require your network administrator or Technical Support.
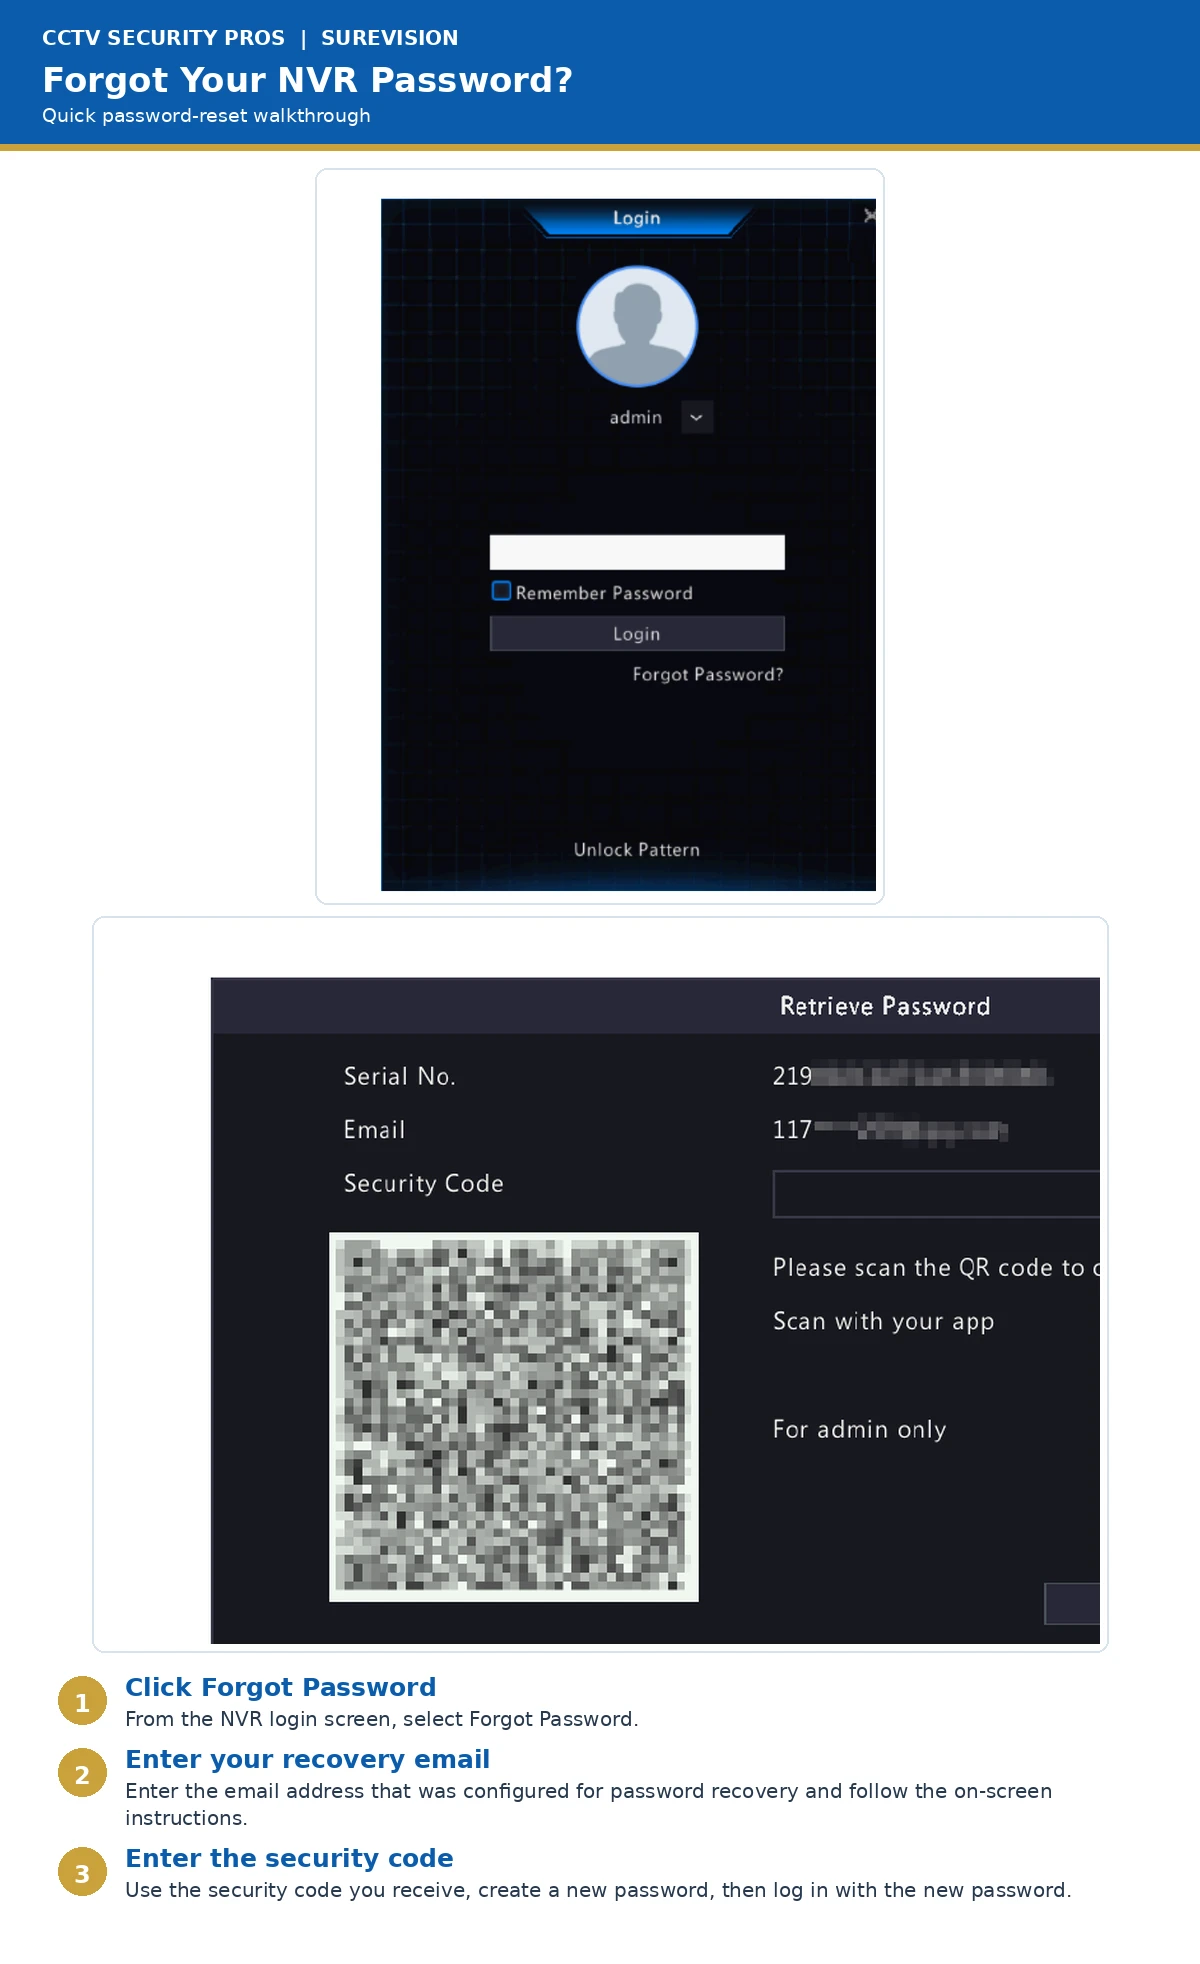
5. I forgot my password or my login does not work. What should I do?
Identify which credential is failing: recorder administrator, app account, or recorder password saved in the app/software.
1. Try signing in directly at the recorder with its monitor and mouse.2. If local login works, update the stored device credentials in the app or desktop client.
3. If the recorder password is forgotten, use Forgot Password when available and follow the configured recovery method.
4. If recovery fails, contact support with the recorder model and order information.
Do not repeatedly guess passwords. Failed attempts can temporarily lock the account.
6. How do I initially install and set up my security camera system?
Complete initial setup directly at the recorder. A laptop normally does not replace the monitor needed for local setup.
1. Connect a compatible monitor and the included mouse.2. Connect cameras to the correct PoE or coax inputs.
3. Apply power and complete the startup wizard, password, recovery options, time zone, date and time.
4. Confirm each camera displays locally.
5. Review recording schedule and storage status.
6. Connect the LAN port to the router, confirm Online status, then configure remote viewing.
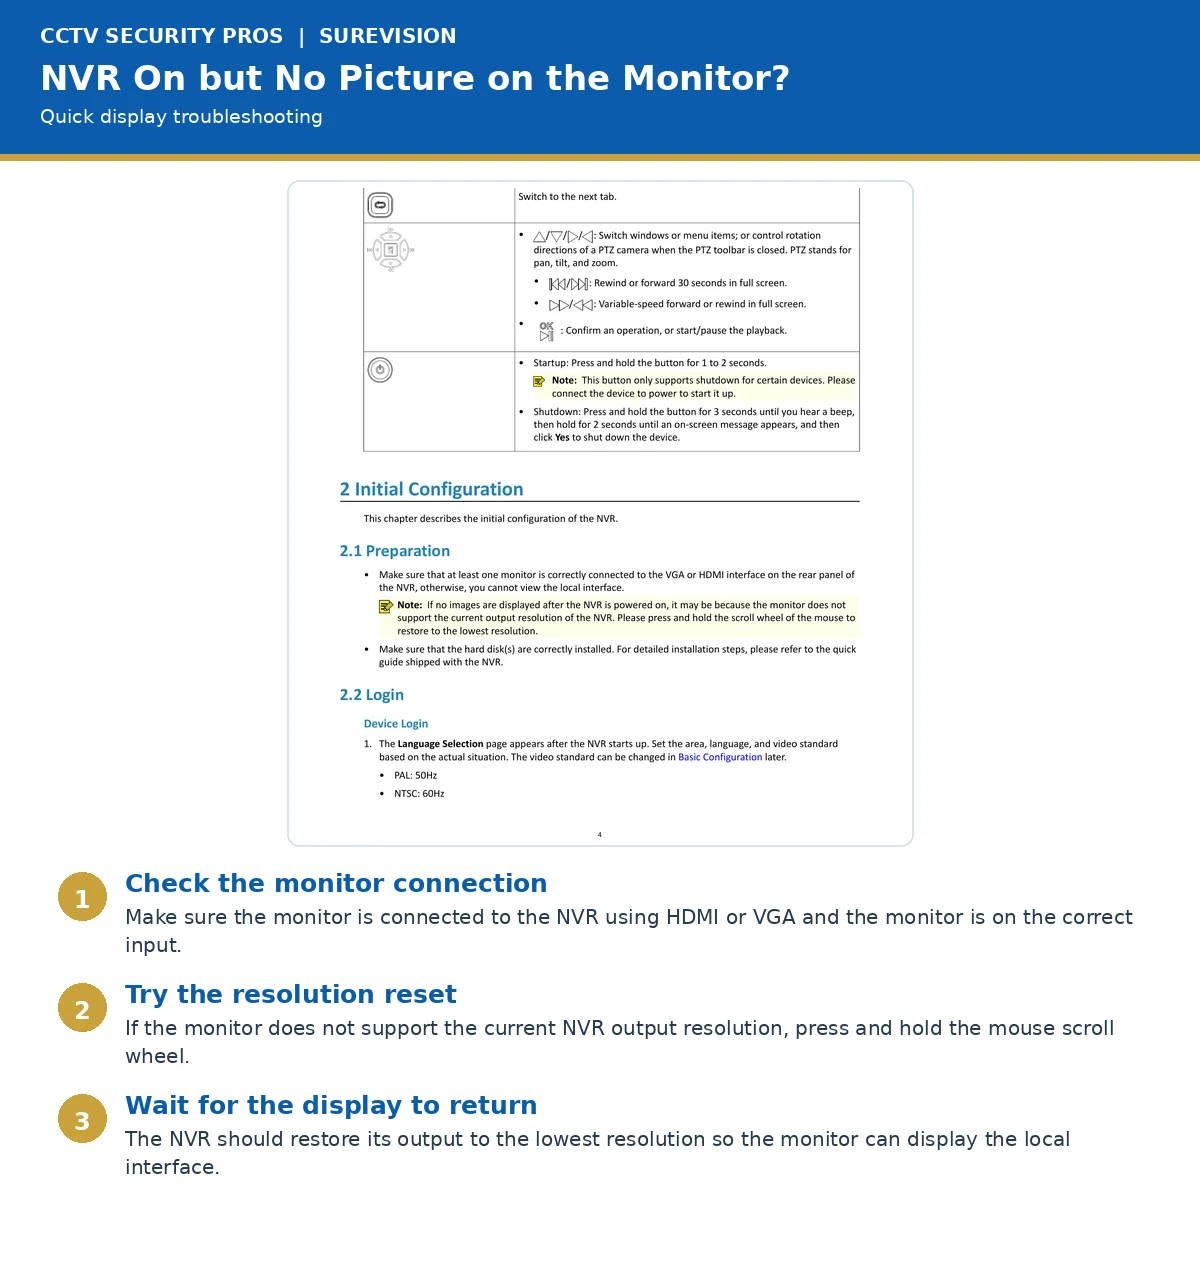
If the recorder has power but the monitor is blank, verify monitor input, HDMI/VGA connection and display compatibility first.
7. How do I add, replace or activate a camera on my recorder?
2. Connect the camera and allow one or two minutes for startup.
3. Open Camera Management and locate the discovered camera.
4. Let supported plug-and-play cameras add automatically.
5. For manual addition, select the IP address, channel and correct protocol, then enter camera credentials.
6. Confirm the channel shows Online and displays video.
Do not change plug-and-play addressing unless required. Third-party compatibility depends on protocol, resolution, firmware, credentials and features.
8. My cameras work on the local monitor, but remote viewing fails. Why?
Local video confirms the camera-to-recorder path works. Focus on the recorder-to-router and app-to-recorder connections.
1. Connect the router to the recorder's LAN port, not a PoE camera port.2. Confirm valid IP address, gateway and DNS values.
3. Verify P2P/remote-access status shows Online.
4. Reopen the app and refresh its device list.
5. Verify the saved recorder username and password.
6. Test the phone away from local Wi-Fi to confirm true remote access.
If the recorder is online but access still fails, a managed firewall, VLAN or DNS policy may require review.
9. Why is my recorder not recording, or what is wrong with the hard drive?
2. Confirm the drive is detected and reports Normal or Healthy.
3. Check capacity, available space and overwrite setting.
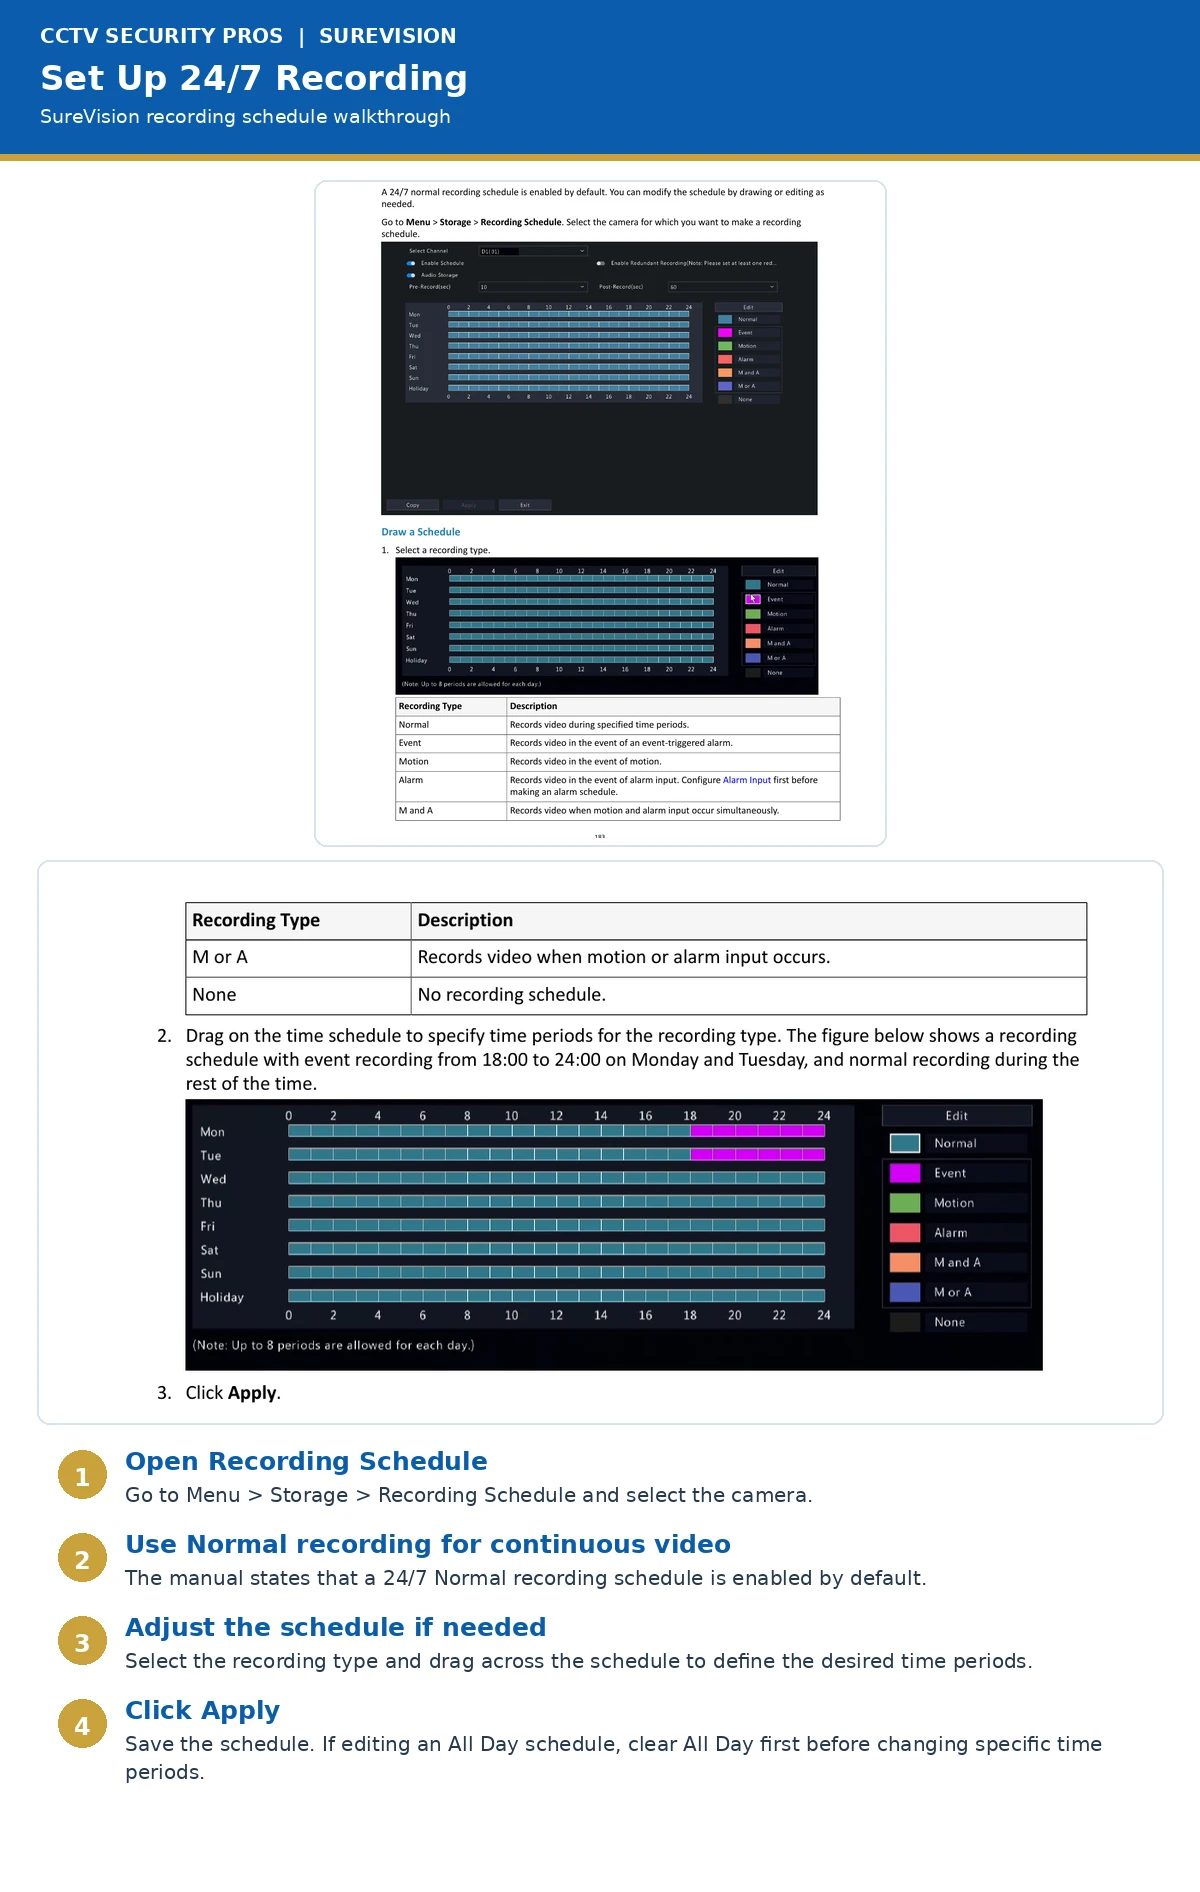
4. Review the recording schedule for the affected channel and day.
5. Confirm date/time, then perform a short playback test.
10. How do I change the recorder's IP address, DHCP or network settings?
For standard router installations, DHCP is the safest starting point because the router supplies compatible network information.
1. Open Network or TCP/IP settings.2. Photograph the current values before changing them.
3. Enable DHCP, apply and allow a new address.
4. Confirm the IP matches the router network and gateway/DNS fields are populated.
5. Verify P2P/remote access returns to Online.
Static IP caution: use one only when coordinated with the network administrator or support. A wrong or duplicate address can disable access.
11. How do I configure motion detection, smart alerts or phone notifications?
Configure the event at the recorder first, then allow notifications in the app and phone settings.
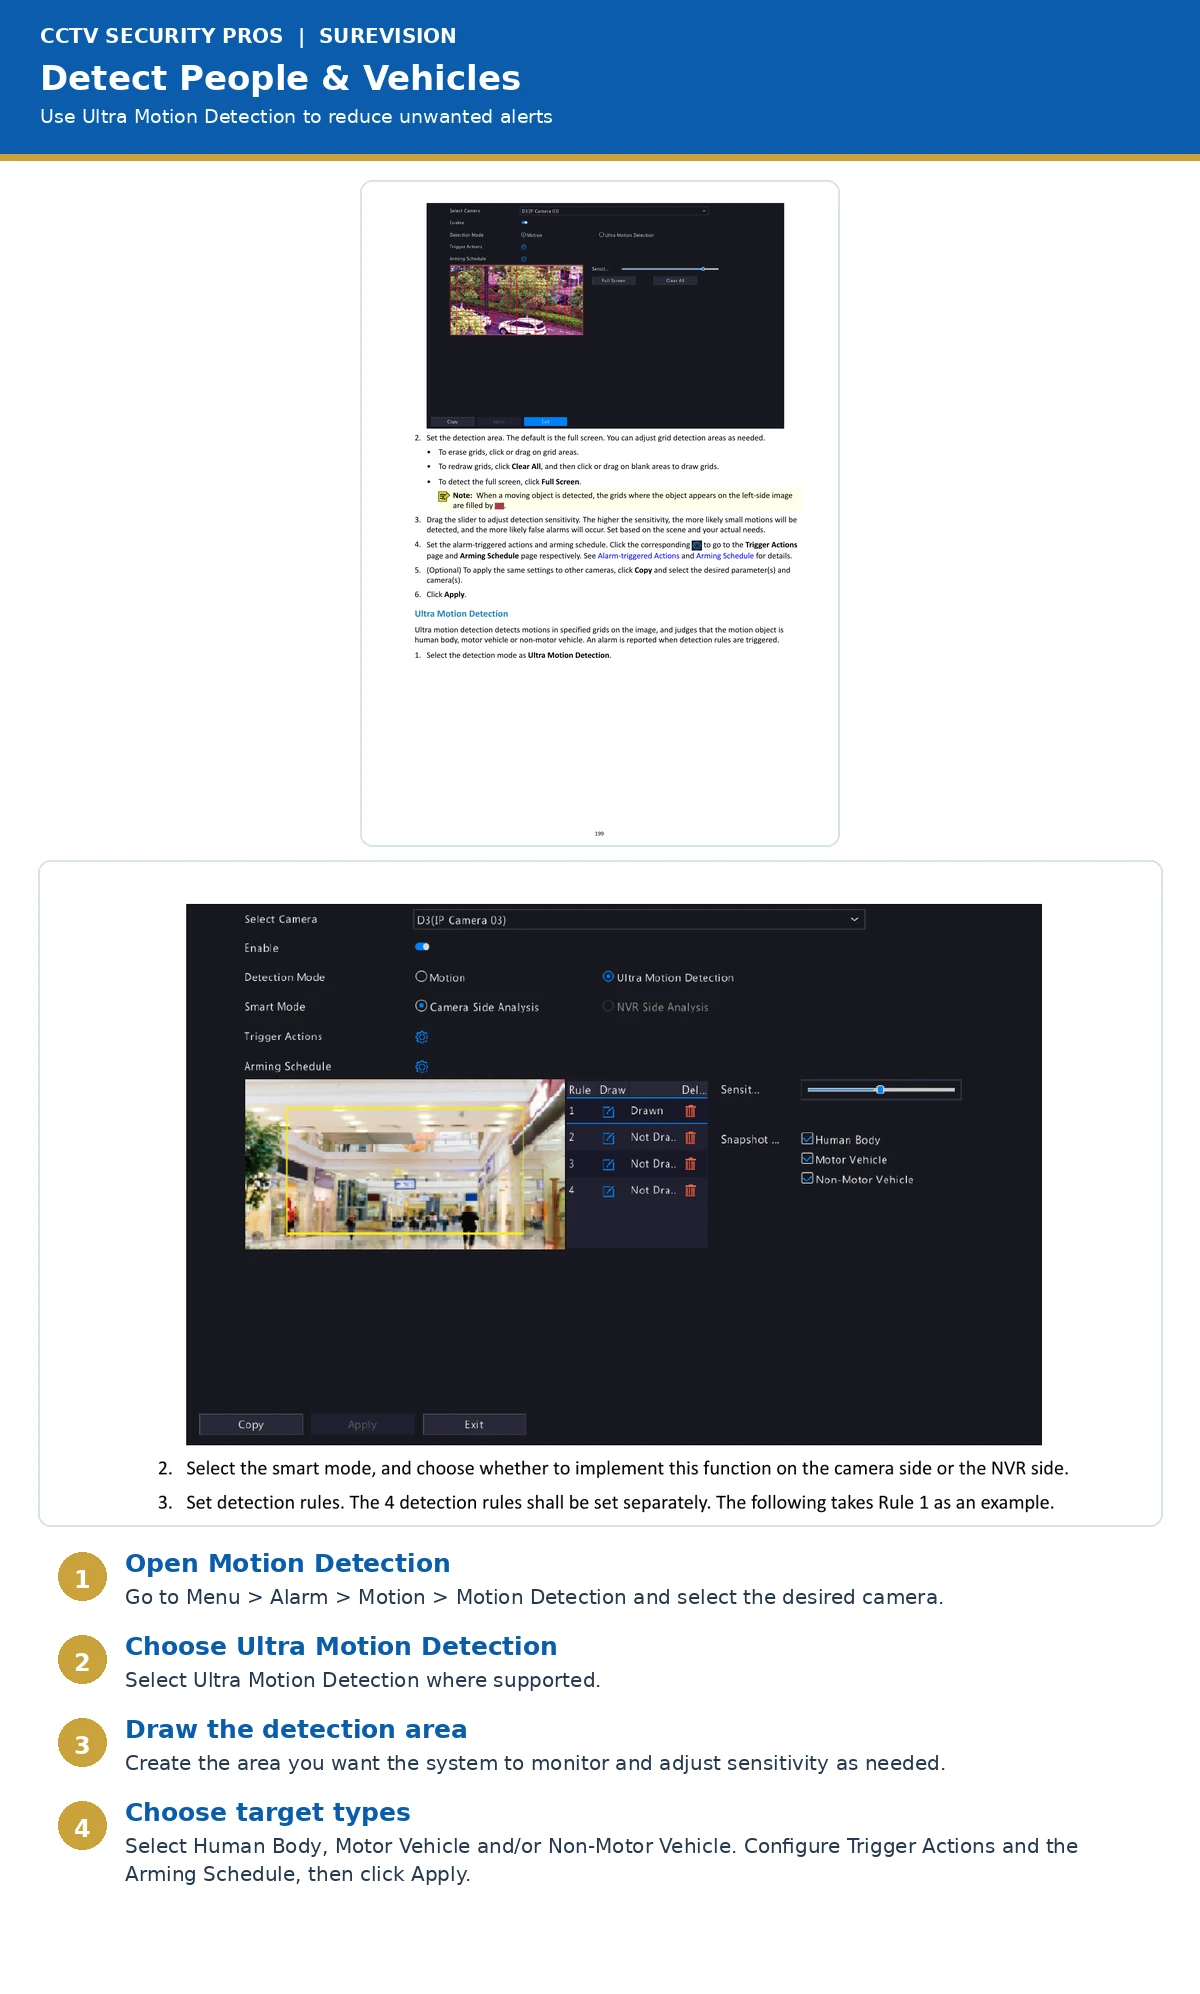
1. Open Alarm/Event settings and select the camera.2. Enable Motion Detection or supported SureVision human/vehicle detection.
3. Draw the area, choose target types and set reasonable sensitivity.
4. Set the arming schedule and actions, then apply.
5. In the app, allow device alarms and app notifications.
6. Allow notifications in the phone operating system and perform a controlled walking test.
Person and vehicle classification usually gives more useful alerts than basic motion when supported.
12. How do I share camera access with another person or phone?
2. Use device sharing when available, or add the recorder with approved device information.
3. For employees or vendors, create a separate recorder user with limited permissions.
4. Confirm the device is Online and test permitted live view/playback.
5. Remove access when no longer needed.
Avoid distributing the main administrator password. Separate users simplify permission limits and access removal.
13. Why can I not hear audio from a camera?
2. Confirm audio is enabled for the stream/encoding profile.
3. In Live View, select one camera and unmute the audio icon.
4. For recorded audio, confirm it was enabled before the incident.
5. Test locally and remotely to separate camera settings from device volume.
Audio-recording laws vary. Confirm the rules for your location and use signs or consent where required.
14. How do I adjust PTZ, motorized zoom, picture or night-vision settings?
Controls depend on the camera. A fixed-lens camera cannot perform optical zoom or pan/tilt just because digital controls appear.
1. Confirm the model supports the movement, zoom or image feature.2. Select the camera in Live View and open PTZ/zoom controls.
3. Use Image settings for exposure, brightness, backlight, day/night, infrared or white light.
4. Change one setting at a time and test under the problem lighting.
5. Record the original value before changing advanced settings.
If a feature is unavailable, confirm camera capability and recorder compatibility before changing protocol or firmware.
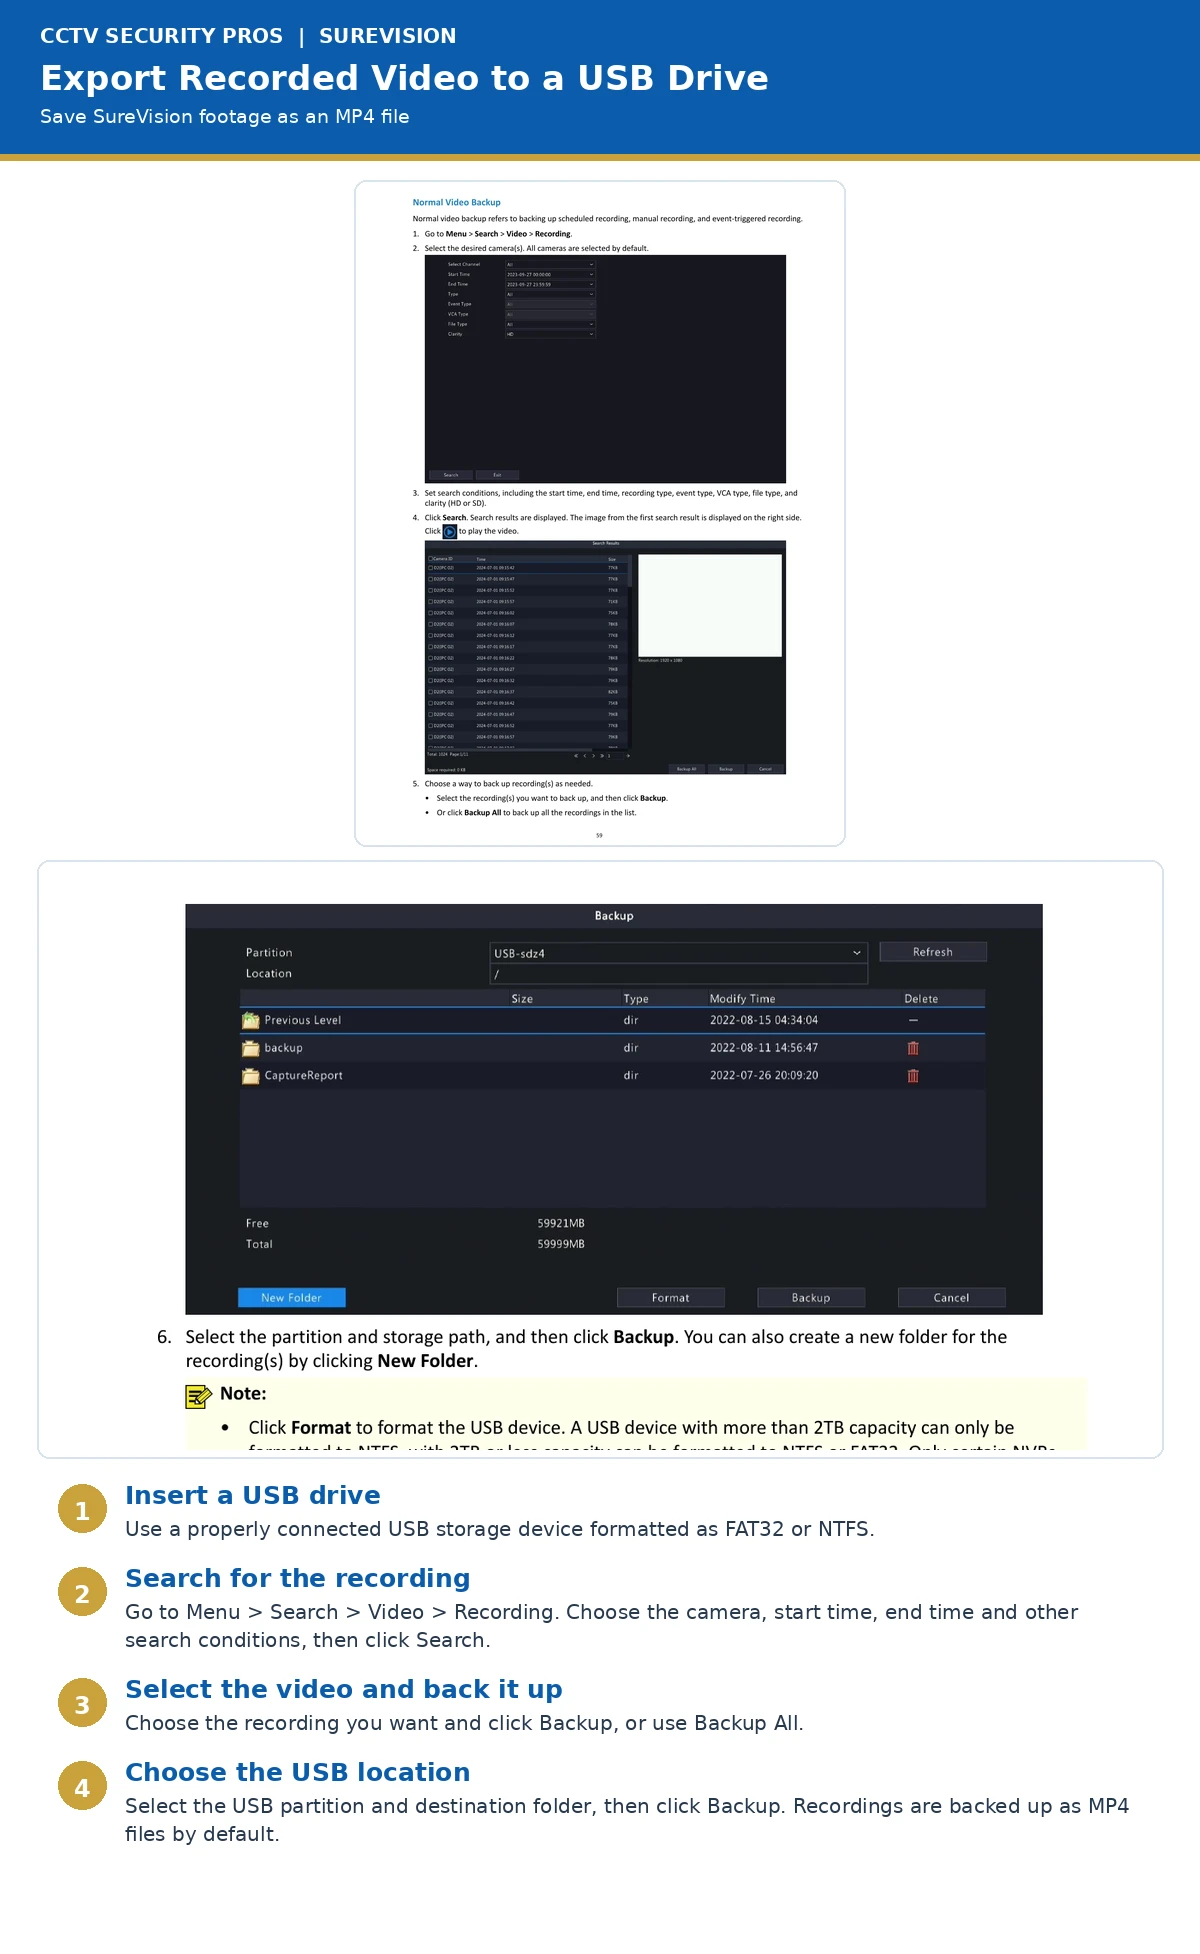
15. How do I export or download recorded video?
2. Insert a compatible USB flash drive into the recorder.
3. Open Search, Backup or Export; select the channel/time range and search.
4. Select the clip and USB destination.
5. In supported computer software, select Download/Export and note the destination folder.
6. Play the exported file and confirm the correct video and time range before removing the USB drive.
For an important incident, preserve the original recorder and exported file, keep another copy and document the camera/time range.
Security Camera Hard Drive Calculator
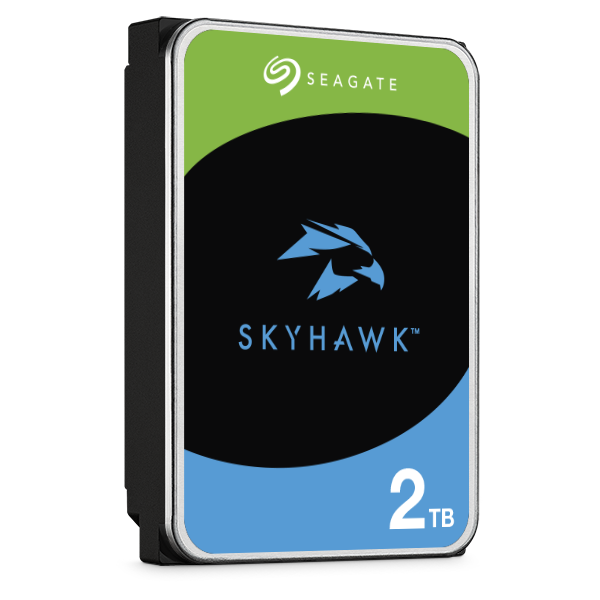
Estimate the hard-drive capacity and approximate video retention needed for your NVR or DVR based on your cameras and recording settings.
OPEN HARD DRIVE CALCULATOR →
Still Need Help?
Have your recorder model, camera model, order number, exact error message and completed troubleshooting ready.
CALL 888-653-2288 EMAIL SUPPORT SUBMIT SUPPORT REQUEST